ngrok
In certain cases you may want to share or expose you local web server on the internet (e.g., share access with a teammate or customer to demonstrate the work or discuss the progress). Working with external web services that expect a callback URL is also generally not possible with a local environment.
ngrok
ngrok creates a tunnel from the public internet http://<subdomain>.ngrok.io to a port on your local machine.
You can share the auto-generated URL with anyone to give them access to your local development environment.
ngrok also has a web UI with an inspector for the HTTP traffic flowing over the tunnel.
Usage
Inside the project folder run:
fin share
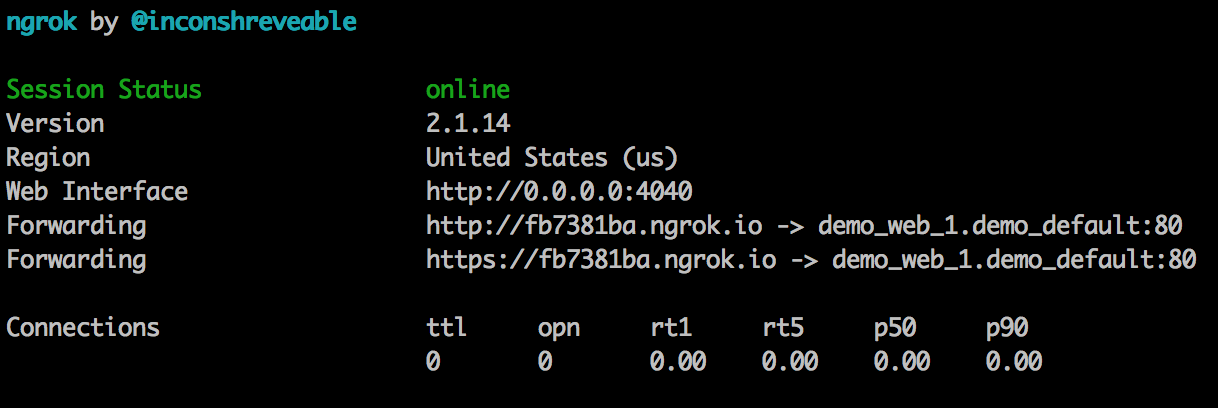
You will see a console output from the ngrok container.
Use *.ngrok.io web address displayed there to share your project with others:
Use Ctrl+C to stop ngrok and sharing.
To access ngrok web UI, open another console window and run:
fin docker ps --format "{{.Names}} {{.Ports}}" | grep ngrok
In the output, look for the port number assigned to the container:
$ fin docker ps --format "{{.Names}} {{.Ports}}" | grep ngrok

project_web_1_ngrok 0.0.0.0:32769->4040/tcp
Access ngrok web UI at http://192.168.64.100:32769
Overriding Default Host Value
The default HOST header value (passed to the web container) can be overridden using --host-header option.
This can be useful to share a specific site in a Drupal multi-site project.
fin share --host-header=example.com
Additional ngrok Configuration
Additionally, you can specify one of several environment variables to configure your ngrok tunnel. These can be configured using an option as part of the fin share command or
can either be stored in $HOME/.dockal/docksal.env or at the project level within .docksal/docksal.env. Due to the nature and sensitivity of these variables, they
should be configured within .docksal/docksal-local.env and not committed to the repository.
| Option | Variable | Purpose |
|---|---|---|
--auth=XXXXX |
NGROK_AUTH | Authentication key for your ngrok account. This is needed for custom subdomains, custom domains, and HTTP authentication. |
--hostname=example.com |
NGROK_HOSTNAME | Paying ngrok customers can specify a custom domain. Only one subdomain or domain can be specified, with the domain taking priority. |
--subdomain=test |
NGROK_SUBDOMAIN | Name of the custom subdomain to use for your tunnel. You must also provide the authentication token. |
--username=username |
NGROK_USERNAME | Username to use for HTTP authentication on the tunnel. You must also specify an authentication token. |
--password=password |
NGROK_PASSWORD | Password to use for HTTP authentication on the tunnel. You must also specify an authentication token. |
--protocol=UDP |
NGROK_PROTOCOL | Can either be HTTP or TCP, and it defaults to HTTP if not specified. If set to TCP, ngrok will allocate a port instead of a subdomain and proxy TCP requests directly to your application. |
--port=8000 |
NGROK_PORT | Port to expose (defaults to 80 for HTTP protocol). |
--region=us |
NGROK_REGION | Location of the ngrok tunnel server; can be us (United States, default), eu (Europe), ap (Asia/Pacific) or au (Australia) |
--debug |
NGROK_DEBUG | To debug the connection and see a more detailed log set this to 1 |
--host-header=test.example.docksal |
NGROK_HEADER | Set Host Header. Set to the domain that should be passed through to the host. |
Configuration File
If ngrok is being used often with the same settings, you can consolidate your commands into an official ngrok config file. Copy the example config file from the Docksal project repo into your project repo as .docksal/etc/ngrok/ngrok.yml. For more details on the configuration file and configuration options, view the ngrok documentation.
Note: It is also possible to add/override these values via .docksal/etc/ngrok/ngrok-local.yml at the project level. Keep in mind, .docksal/etc/ngrok/ngrok.yml is a shared configuration file and should be committed to git. .docksal/etc/ngrok/ngrok-local.yml, on the other hand, can be used for local overrides and should be excluded from git. As such, it is best to use .docksal/etc/ngrok/ngrok-local.yml for any personal details configured at the project level.
If you use the config file, all command line flags will be disregarded.
Tunneling to multiple project sites
Add the following to
.docksal/etc/ngrok/ngrok-local.ymlto setup tunnels to multiple sites running in the same project:authtoken: scrubbed tunnels: site1: addr: project_web_1.project_default:80 proto: http host_header: site1.projecthost.docksal hostname: site1.ngrok.customdomain.com site2: addr: project_web_1.project_default:80 proto: http host_header: site2.projecthost.docksal hostname: site2.ngrok.customdomain.com site3: addr: project_web_1.project_default:80 proto: http host_header: site3.projecthost.docksal hostname: site3.ngrok.customdomain.com site4: addr: project_web_1.project_default:80 proto: http host_header: site4.projecthost.docksal hostname: site4.ngrok.customdomain.comRun
fin shareto start ngrok and open the tunnels. It will automatically use the configuration file above.
In the above example a wildcard domain is used. In this example that is *.ngrok.customdomain.com. Add this as a CNAME DNS entry pointed to the designated ngrok host assigned to it in your dashboard. Additional documentation about adding a wildcard domain to your account can be found at https://ngrok.com/docs#wildcard.
The above example leverages a Business account plan with ngrok, which allows for wildcard domains, multiple open tunnels and custom hostname/subdomains. See plans and pricing at https://ngrok.com/pricing.