Install Docksal
System requirements
RAM requirement: 8GB or more.
Mac
Must be a 2010 or newer model.
Linux
CPU with SSE4.2 instruction set supported (most CPUs). If you get output from the following command, then your CPU is good to go:
cat /proc/cpuinfo | grep sse4_2
Windows
Windows 10 and CPU with hardware virtualization (VT-x/AMD-V) supported and enabled in BIOS.
Install Docksal
Administrative Privileges
The installer script (get.docksal.io) requires administrative privileges to complete the installation.
Here’s why:
- All systems:
fincli tool is written to/usr/local/bin(all systems) - All systems:
192.168.64.100(Docksal’s canonical IP) is assigned to the host’s local network interface (all systems) - macOS:
/etc/exportsand/etc/resolver/docksalhave to be modified,nfsdservice has to be restarted - Linux: install/update the Docker service if necessary
- Windows: there are additional requests for permissions to create network shares for local drives to share files with Docker and to mount them with the current user’s account and password.
What is your operating system?
Click to jump to OS-tailored docs:
macOS installation options
Click the preferred option to proceed to option-specific docs.
- Docker Desktop
- Easier to use
- VirtualBox
- Old school style
macOS with VirtualBox
With this method, Docker will run inside a VM in VirtualBox.
Install VirtualBox v5.2.32
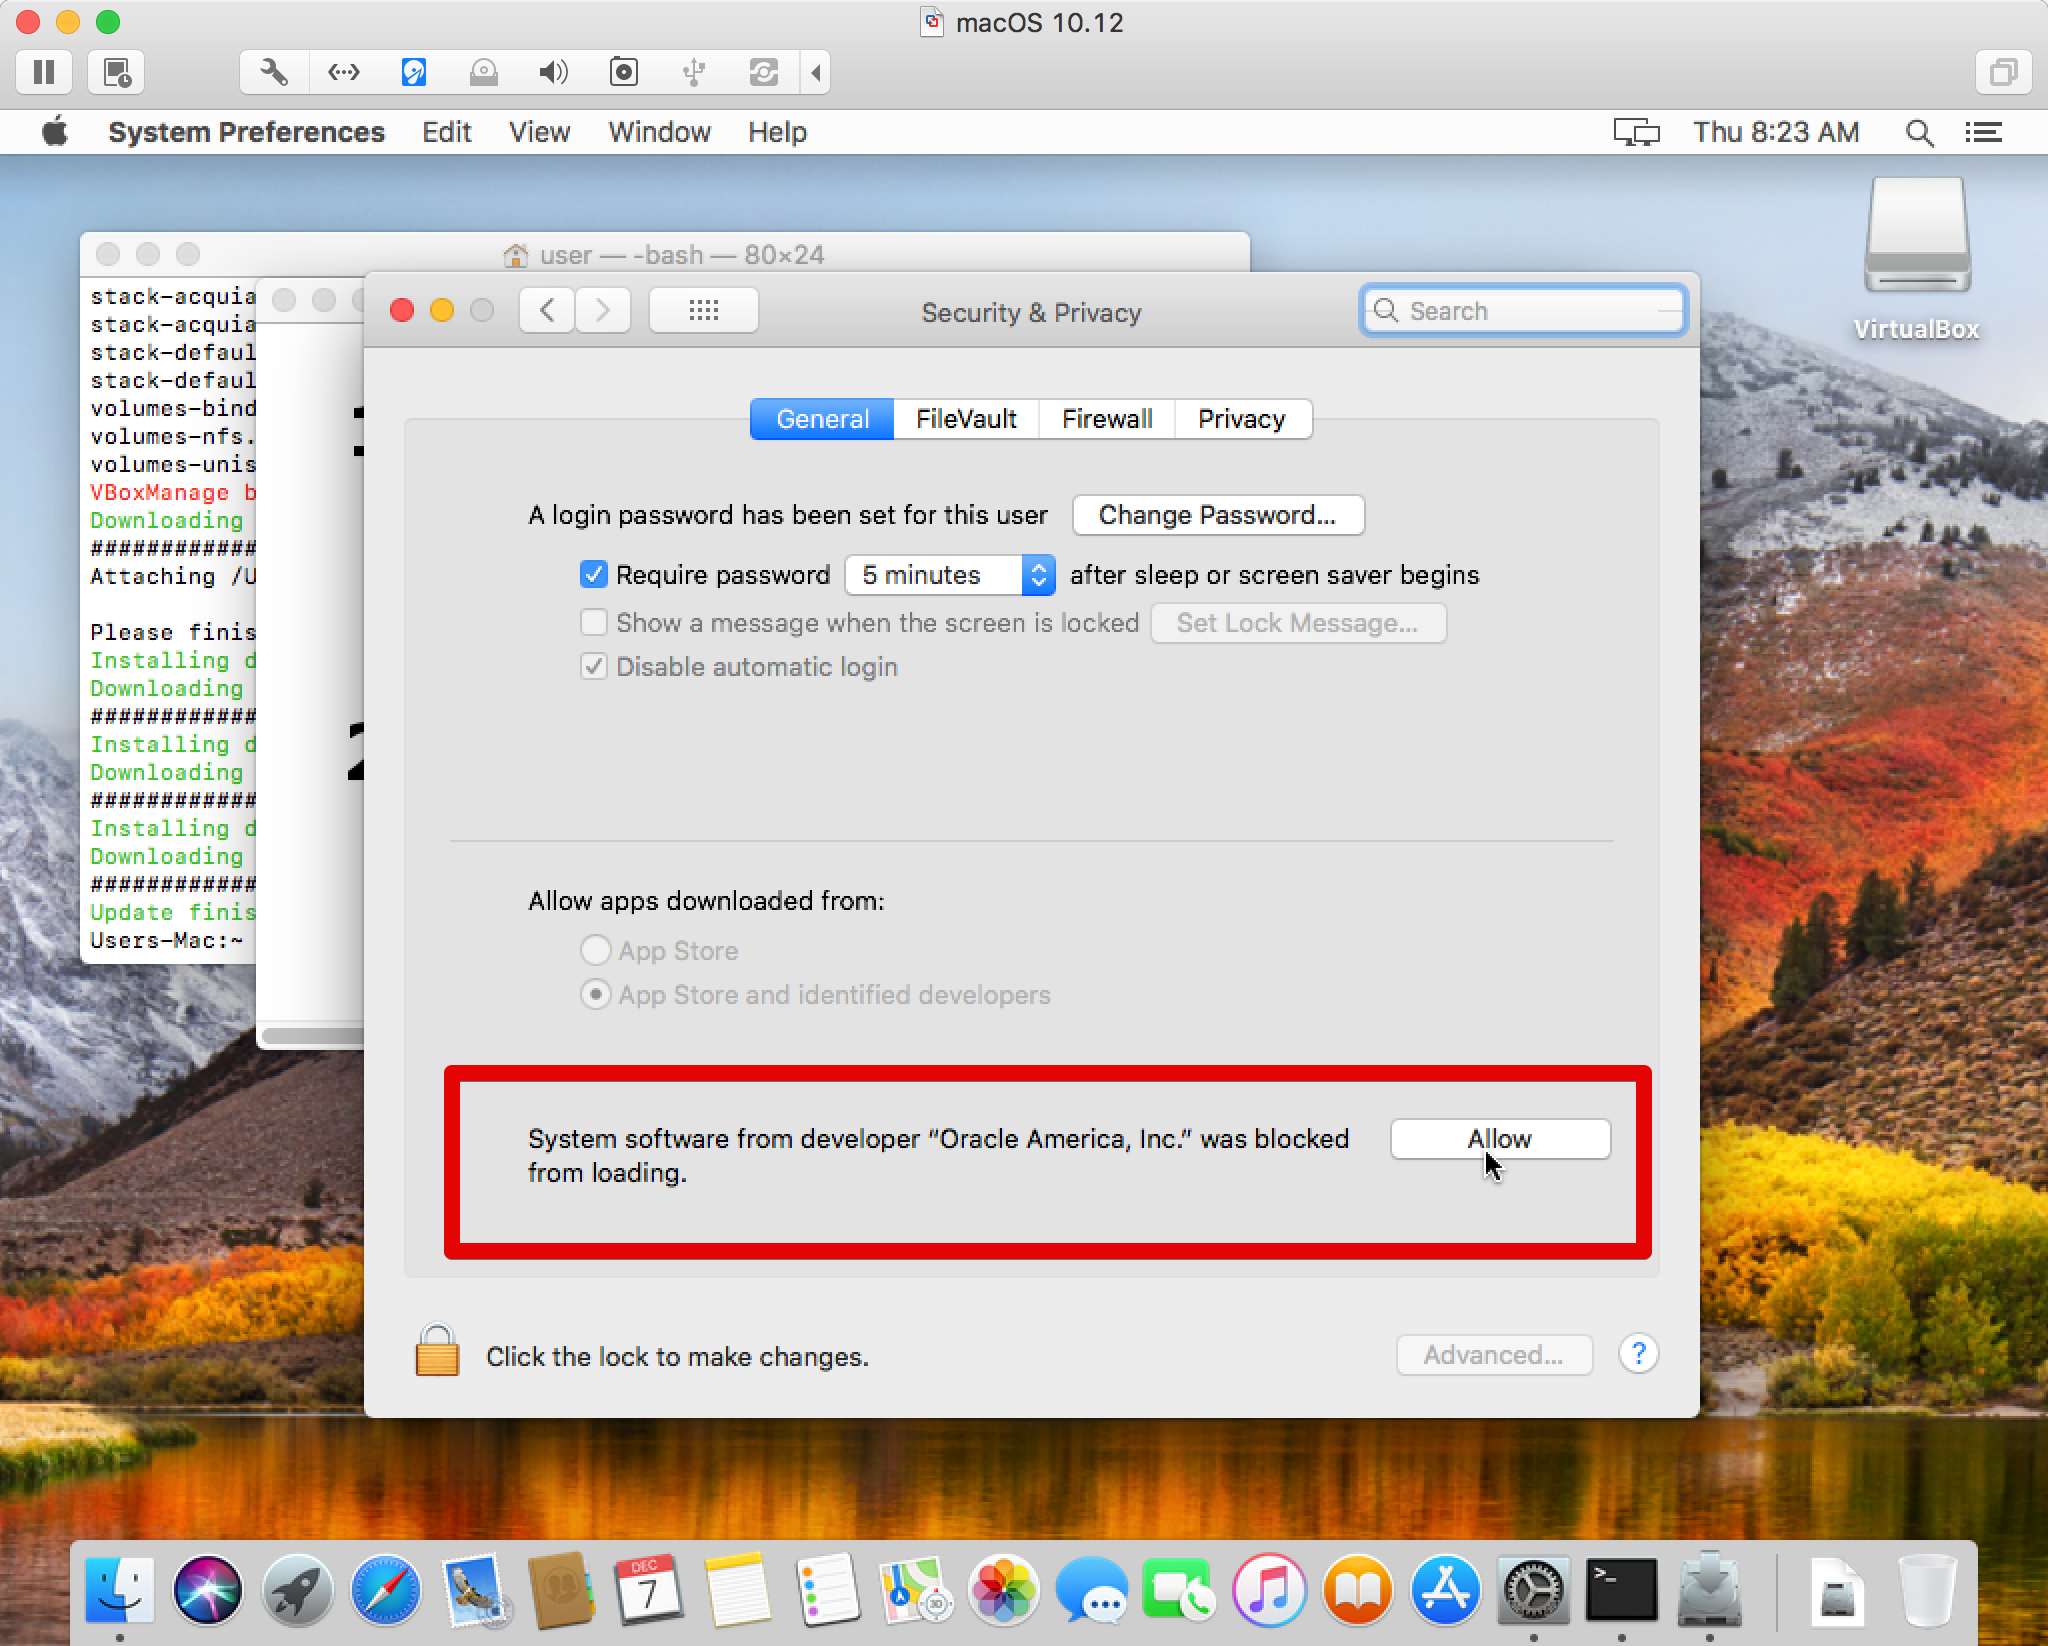
Enable Kernel extension (Why?)
Go to
System Preferences > Security & Privacy.
If you do not see the Allow button it means the extension is already enabled.
Open Terminal app and run
bash <(curl -fsSL https://get.docksal.io)Start Docksal
fin system start
macOS with Docker Desktop
Docker Desktop v2.2.0.0+ versions introduced a regression that breaks Docksal. Please refrain from updating and stick with the version linked below.
Install Docker Desktop for Mac v2.1.0.4
Start Docker Desktop
Wait until it says “Docker is running” in the menubar icon menu.
Open Terminal app and run
DOCKER_NATIVE=1 bash <(curl -fsSL https://get.docksal.io)
Linux installation options
Click your repo to proceed to docs.
Linux. Debian, Ubuntu, and Fedora distributions
Debian with all derivatives (Ubuntu, Raspbian etc.), Ubuntu with derivatives (Mint, etc.), and Fedora with derivatives are supported out of the box with automatic installation.
Check pre-requisites
By default, Apache listens on
0.0.0.0:80and0.0.0.0:443. This will prevent Docksal reverse proxy from running properly. You can resolve it an any of the following ways:- Reconfigure Apache to listen on different host (e.g.,
127.0.0.1:80and127.0.0.1:443) - Reconfigure Apache to listen on different ports (e.g.,
8080and4433) - Stop and disable Apache
- Reconfigure Apache to listen on different host (e.g.,
Check your software.
Check that you have installed and configured
- curl
- sudo
Open Terminal and run
bash <(curl -fsSL https://get.docksal.io)
Linux. Other distributions
If you cannot find your distribution in the list above, it does not mean it is not supported! Lesser known Debian, Ubuntu, or Fedora derivatives are most likely supported.
This happens because Docker on Linux is being installed using the official get.docker.com script. If your distribution is not in the list above, but get.docker.com supports it, then it is supported too and you can follow the steps for compatible distributions.
In case your distribution in not compatible with get.docker.com, you will need to install latest stable Docker for your distribution first, and then follow the steps for compatible distributions.
Windows installation options
Click the preferred option to proceed to option-specific docs.
- VirtualBox
- Faster, allows launching Vagrant alongside.
- Docker Desktop
- Easier to use. Do not use if you have existing Vagrant projects or VirtualBox VMs
- Easier to use. Do not use if you have existing Vagrant projects or VirtualBox VMs
Windows and VirtualBox
Enable Windows Subsystem for Linux (WSL) support
Install Ubuntu 18.04 app from Microsoft Store
Install Docksal (VirtualBox will be installed automatically if necessary)
Open Ubuntu shell and run:
bash <(curl -fsSL https://get.docksal.io)Start Docksal
In Ubuntu shell run:
fin system start
Windows and Docker Desktop
Docker Desktop v2.2.0.0+ versions introduced a regression that breaks Docksal. Please refrain from updating and stick with the version linked below.
Enable Windows Subsystem for Linux (WSL) support
Install Ubuntu 18.04 app from Microsoft Store
Install Docker Desktop for Windows v2.1.0.3
Configure Docker Desktop on Windows
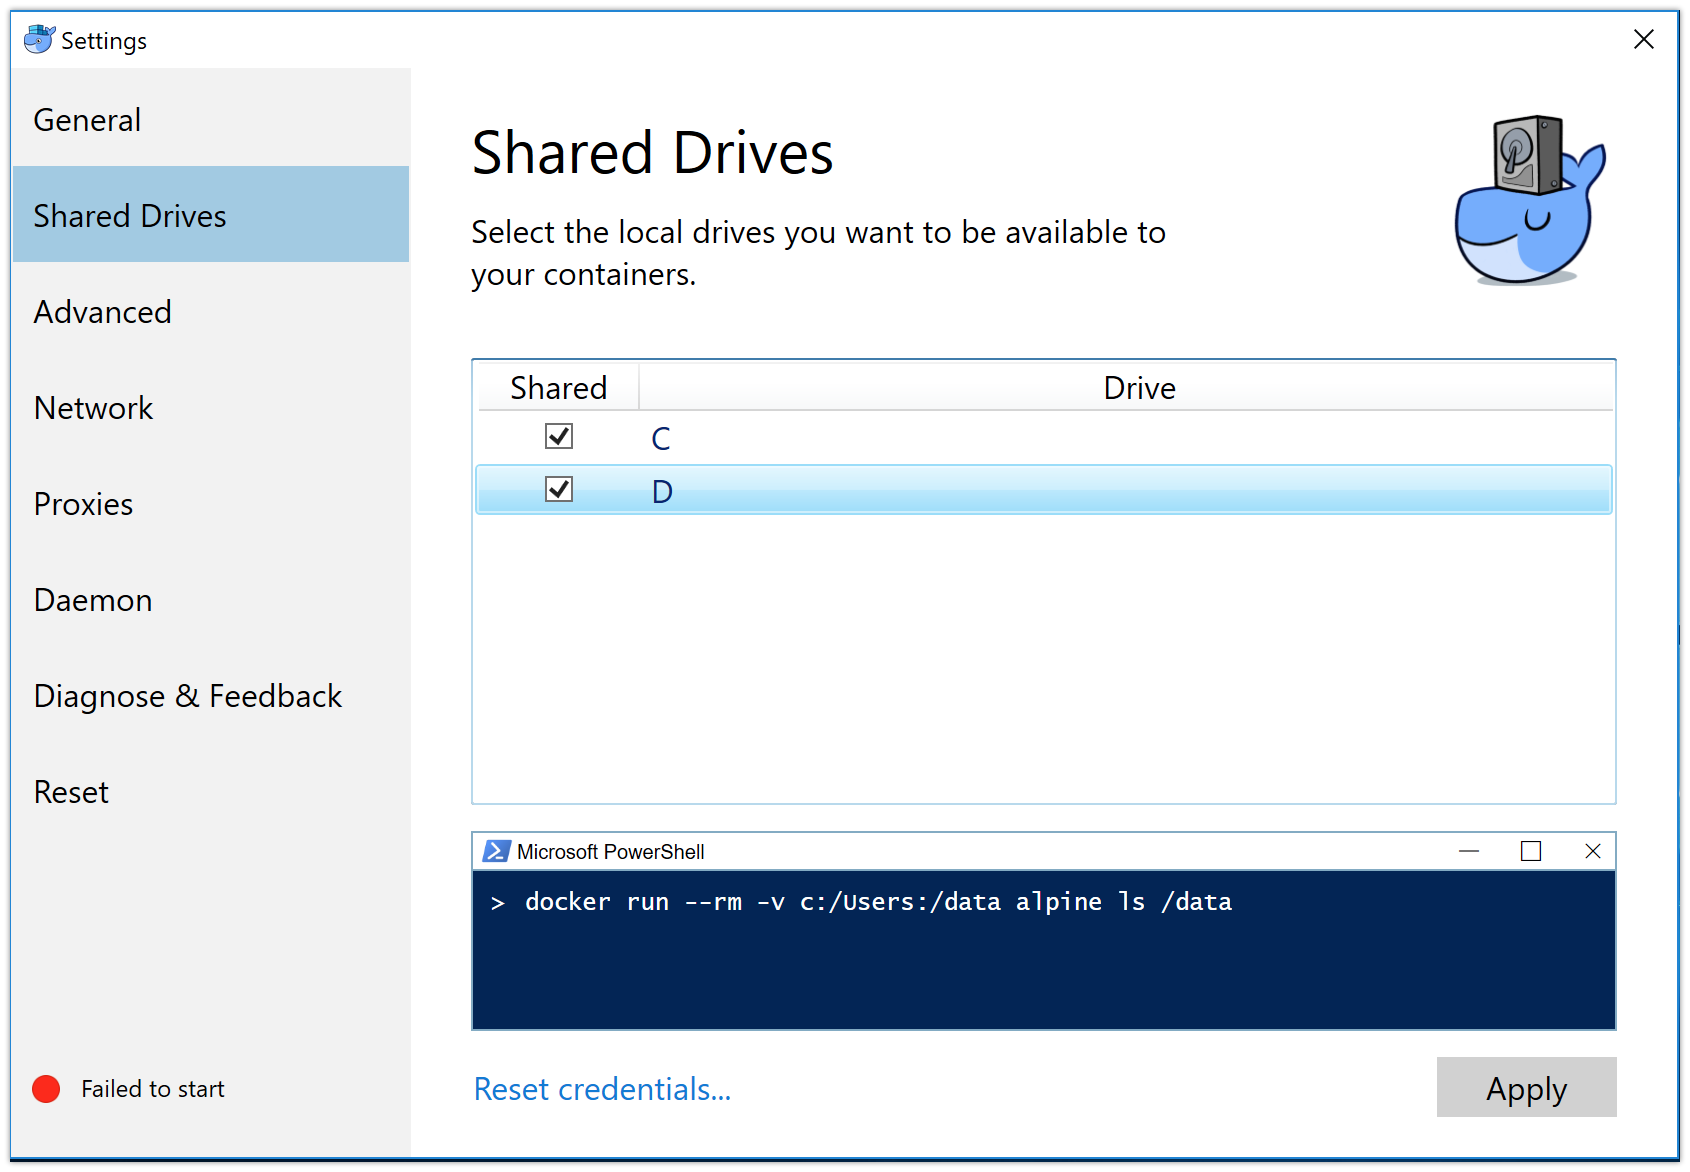
4.1. Share your local drives with Docker for Windows:

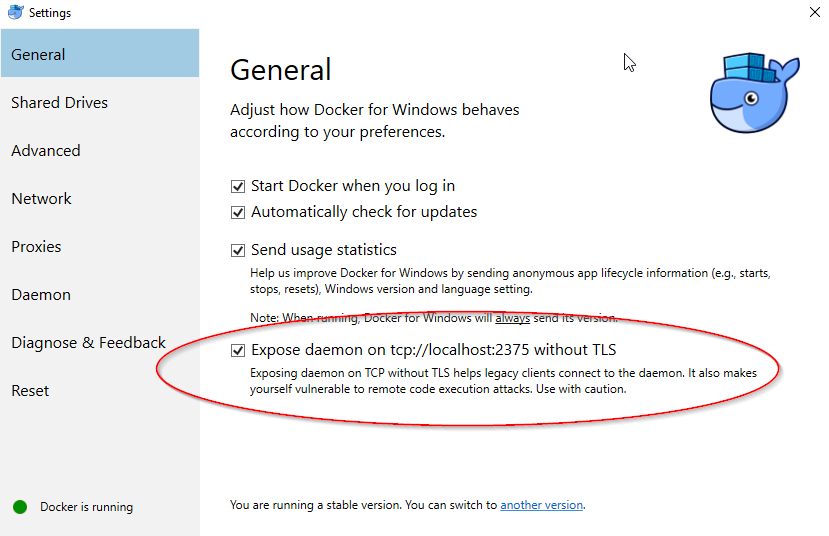
4.2. Share Docker Desktop port to the local network:

Install Docksal
Open Ubuntu shell and run:
DOCKER_NATIVE=1 bash <(curl -fsSL https://get.docksal.io)
Update Docksal
All Docksal components can be updated with a single command:
fin update
Uninstall Docksal
If you used VirtualBox
The steps below will remove the Docksal VM and cleanup all Docksal stuff.
fin system stop
fin vm remove
rm -rf "$HOME/.docksal"
rm -f /usr/local/bin/fin
Optionally, remove VirtualBox application.
If you used Docker Desktop
The steps below will remove Docksal project containers (files untouched) and stop Docksal system services.
fin cleanup
fin system stop
rm -rf "$HOME/.docksal"
rm -f /usr/local/bin/fin
Optionally, uninstall Docker Desktop.
If you used Linux
The steps below will remove Docksal project containers (files untouched) and stop Docksal system services.
fin cleanup
fin system stop
rm -rf "$HOME/.docksal"
rm -f /usr/local/bin/fin
Optionally, follow Docker removal instructions for Ubuntu, Debian, Fedora, CentOS.


